
No matter how good your email content is, some contacts will eventually unsubscribe for several different reasons — whatever they might be. You should pay attention to why people unsubscribe, as the feedback can help you create even better content. Unfortunately, Hubspot doesn’t provide unsubscribe reason functionality out of the box. But, the good news is that you can implement it yourself with some custom (but simple) code. This is a step-by-step guide for those who don’t have coding knowledge but want to know their contacts’ reasons for unsubscribing in HubSpot.
So, let’s jump straight into it.
Step 1: Create a new custom property
The first thing you need to do is create a custom contact-object property in HubSpot. To do so, go to Settings (cogwheel on the right-hand side) -> Data Management -> Properties.
Next, you will create a new property by clicking the “create property” button. Once you’ve done that, you will need to configure the new property by giving it a name (label), selecting a group to which you want it to belong, and a description (optional). In our case, the property is called “unsubscribe reason” and belongs to the contact information group. The field type is going to be radio select (if you want to contacts to be able to select multiple reasons, you can set the field type to multiple checkboxes instead). The next step is to add your reasons. You can add as many as you need, depending on your use case. Ensure that “show in forms” is checked, as we will be using the property in a form.
Step 2: Create a new HubSpot form
You will need to create a new form and add the property created above to the form.
Here, you have two options:
- You can have contacts enter their email in addition to their feedback. This will allow you to know the unsubscribe reason for each contact record.
- If you decide to not add email, you will still be able to collect unsubscribe reasons, but you won’t know which contact chose what reason. You will only be able to view general statistics in the performance section of the form. You will see how many people chose what reason, but you won’t know the contact’s name or email, or anything else for that matter.
Step 3: Create a new HubSpot module
This is probably the most complicated step, but keep reading.
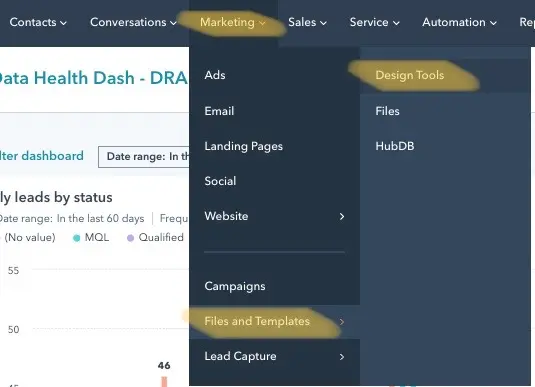
First, navigate to “design tools”. You will find it under Marketing > Files and templates > Design Tools.
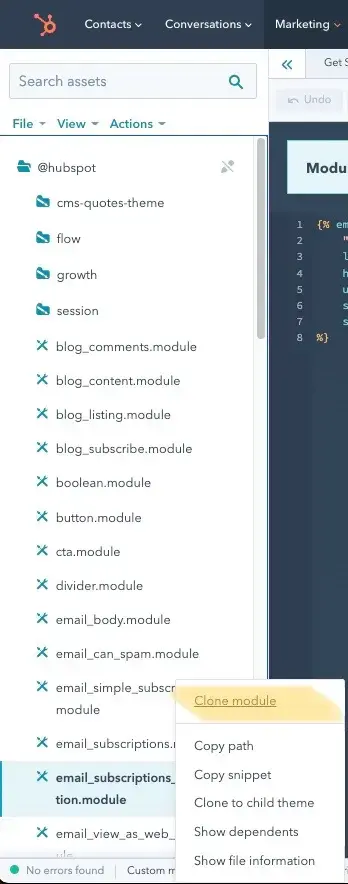
Next, you’re going to create a new subscription module by cloning HubSpot's existing module. You can find it by navigating to @hubspot/email_subscriptions_confirmation. Once you’ve cloned it, you will modify the new file as described in the following steps.
Module.html section
There are a couple of things that need to be changed here.
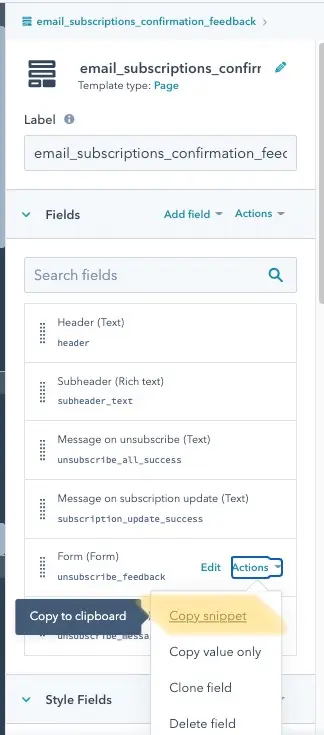
First, you will need to add your form. Navigate to the “Fields” tab on the right-hand side. Next, click “Add field” and select “Form” from the dropdown menu. Then, select the default form which is simply the new form you just created.
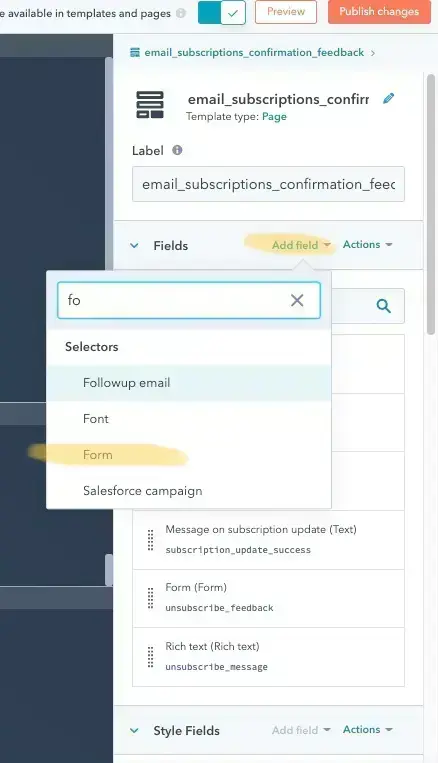
Once that’s complete, copy the snippet of the new field and paste it into the module.html section, right below the default code provided by HubSpot.
Wrap both sections in a <div></div> like in the code below. You must add classes in your <div> tags for everything to work.
1<div class="confirmation-message">
2  {% email_subscriptions_confirmation
3  "email_subscriptions_confirmation"
4  label='Subscriptions Update Confirmation',
5  header='{{ module.header }}',
6  unsubscribe_all_success="{{ module.unsubscribe_all_success }}",
7  subscription_update_success="{{ module.subscription_update_success }}",
8  subheader_text="{{ module.subheader_text }}"
9  %}
10</div>
11
12<div class="unsubscribe_feedback">
13  {% form
14  form_to_use="{{ module.unsubscribe_feedback.form_id }}"
15  response_response_type="{{ module.unsubscribe_feedback.response_type }}"
16  response_message="{{ module.unsubscribe_feedback.message }}"
17  response_redirect_id="{{ module.unsubscribe_feedback.redirect_id }}"
18  response_redirect_url="{{module.unsubscribe_feedback.redirect_url}}"
19  %}
20</div>
Module.css section
You can leave this blank, but if you want to apply custom styling, go ahead.
Module.js section
Because HubSpot uses a single confirmation page for both updating preferences and unsubscribing, we will need to use Javascript to conditionally display our module, so that our module only appears after the user clicks unsubscribe and not after they update subscription preferences.
This code simply looks for the “unsubscribe” keyword on the confirmation page. It allows to flip the visibility of the element based on the confirmation message. If the keyword exists, our module will be displayed, but if our keyword is absent, then the module is invisible to the end user.
Now go ahead, copy the code and paste it into the module.js section in your module.
1let confirmationMessage = document.querySelector('.confirmation-message');
2let feedbackContainer = document.querySelector('.unsubscribe_feedback');
3
4if (confirmationMessage.innerHTML.includes("unsubscribed")) {
5	feedbackContainer.style.display = "block"
6} else {
7	feedbackContainer.style.display = "none"
8}
Step 4: Add the module to your template
Now, all you have to do is add your finished module to your confirmation page template, and you’re done.
If you have questions about this step, don't hesitate to send us a message.